728x90
자바스크립트 localStorage 객체
📌 localStorage 객체
웹 브라우저가 기본적으로 제공하는 객체
    <script>
        document.addEventListener('DOMContentLoaded', ()=> {
            localStorage.getItem(키) //저장된 값을 추출
            localStorage.setItem(키, 값) //값을 저장
            localStorage.removeItem(키) //특정 키의 값을 제거
            localStorage.clear() //저장된 모든 값을 제거
        })
    </script
📌 웹 브라우저에 데이터를 저장하는 localStorage 객체 활용하기
<head>
    <meta charset="UTF-8">
    <title>document</title>
    <script>
        document.addEventListener('DOMContentLoaded', ()=> {
            const p = document.querySelector('p')
            const button = document.querySelector('button')
            const input = document.querySelector('input')

            button.addEventListener('click', () => {
                // 저장된 녀석을 모두 제거
                localStorage.clear()
            })

            input.addEventListener('keyup', () => {
                // 입력 양식 내부의 값을 저장
                localStorage.setItem('키', input.value)
            })

        })
    </script>
</head>
<body>
    <p></p>
    <button>지우기</button>
    <input type="text" name="" id="">
</body>
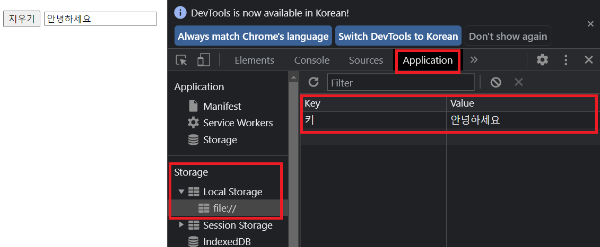
마우스 오른쪽 우클릭 [검사] - [Application] - [Storage] - [local Storage]
값이 저장되는 걸 확인할 수 있습니다.
저장된 값은 새로고침을 해도 그대로 저장되어 있습니다.
지우기 버튼 누르면 삭제되는걸 확인할 수 있다.
<head>
    <meta charset="UTF-8">
    <title>document</title>
    <script>
        document.addEventListener('DOMContentLoaded', ()=> {
            const p = document.querySelector('p')
            const button = document.querySelector('button')
            const input = document.querySelector('input')

            const key = localStorage.getItem('키')
            if(key !== null){
                p.textContent = `이전 실행 때의 마지막 값: ${key}`
                input.value = key
            }

            button.addEventListener('click', () => {
                // 저장된 녀석을 모두 제거
                localStorage.clear()
            })

            input.addEventListener('keyup', () => {
                // 입력 양식 내부의 값을 저장
                localStorage.setItem('키', input.value)
            })

        })
    </script>
</head>
<body>
    <p></p>
    <button>지우기</button>
    <input type="text" name="" id="">
</body>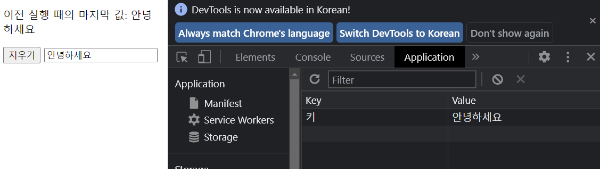
📌 응용. 배경화면 색상 변경
<head>
    <meta charset="UTF-8">
    <title>document</title>
    <script>
        document.addEventListener('DOMContentLoaded', ()=> {
            const p = document.querySelector('p')
            const button = document.querySelector('button')
            const input = document.querySelector('input')
            const select = document.querySelector('select')

            const key = localStorage.getItem('키')
            const color = localStorage.getItem('color')

            if(key !== null){
                p.textContent = `이전 실행 때의 마지막 값: ${key}`
                input.value = key
            }
            if(color !== null){
                document.body.style.backgroundColor = color
            } else {
                document.body.style.backgroundColor = 'red'
            }

            button.addEventListener('click', () => {
                // 저장된 녀석을 모두 제거
                localStorage.clear()
            })

            input.addEventListener('keyup', () => {
                // 입력 양식 내부의 값을 저장
                localStorage.setItem('키', input.value)
            })

            select.addEventListener('change', () => {
               const color = select.options[select.selectedIndex].value
               document.body.style.backgroundColor = color
               localStorage.setItem('color', color)
            })
        })
    </script>
</head>
<body>
    <p></p>
    <button>지우기</button>
    <input type="text" name="" id="">
    <select name="" id="">
        <option value="red">빨간색</option>
        <option value="blue">파란색</option>
        <option value="green">초록색</option>
    </select>
</body>
참고한 책 : 혼자 공부하는 자바스크립트
'JavaScript' 카테고리의 다른 글
| 자바스크립트 클래스의 기본 기능 (0) | 2022.11.10 |
|---|---|
| 자바스크립트 예외 처리 (0) | 2022.11.09 |
| 자바스크립트 to do list 만들기 (0) | 2022.11.08 |
| 자바스크립트 이벤트 활용2 (0) | 2022.11.08 |
| 자바스크립트 이벤트 활용1 (0) | 2022.11.08 |


